The ability to capture and store photos on your smart phone is a feature that many of us enjoy having and take advantage of every day. Keeping those digital photos on your phone allows you to look back at your memories just by opening up the photo app on your device. However, if you only keep one copy of your photos and videos on your smart phone, and don’t back them up elsewhere, you run the risk of losing a collection of photos and memories.
If you have a Windows PC desktop or laptop computer, and want to transfer photos on to it from your iPhone, we’re here to show you how it’s done. There are quite a few ways you can go about this process, but there are 4 ways we’re going to be showing you. Here’s an overview of what we’ll be covering in this article:
- Summary of 4 ways to Transfer photos from iPhone to PC
- Method 1: iCloud for Windows
- Method 2: iCloud.com
- Method 3: Third-party software
- Method 4: Email attachments
- Tips for transferring photos from iOS to PC
Now let’s talk a bit more about the various ways you can transfer photos from your iOS device to PC. We’ll give you a brief description of each one to help you decide which method will work the best for your needs.
Summary of 4 ways to transfer photos from an iPhone to a PC
1. iCloud software for Windows
Apple’s cloud storage system, iCloud, allows for automatic backup and transfer of information, data, and files between Apple devices. If you install the iCloud software for Windows, you can access data from your iPhone stored on iCloud, including your pictures and videos.
2. iCloud website
Similar to how the iCloud desktop software works, you can sign in to your Apple ID account on iCloud.com and access your information and files through there as well. This method allows you to view your photos and videos on your PC without needing to store them on your computer.
3. Third-party software
If you don’t want to use software by Apple to transfer your photos, you can use a different software or storage system. One great option is Dropbox. You can download the Dropbox app on your phone, and add your photos to the app. Then download Dropbox on your PC, and log in to the same Dropbox account as on your iPhone, and you’ll be able to access any photos and videos you added within the app.
4. Send as attachments in emails
Looking to just transfer a handful of photos, and not your entire library? Sending images as attachments in emails is a super simple way to get them from one device to another. The best part about this method is that your email inbox can be accessed on nearly any device (so long as it has Internet access), and you can then download and save the images to the device if you want to.
Now that you know a little more about each of the four methods we’re going to explain in detail, let’s start with the instructions for the first method, using iCloud.
Method 1: Automatically import photos with iCloud for Windows
iCloud for Windows makes it easy to set up your iPhone photos to be automatically imported to your PC. To start, open your PC’s web browser and go to the iCloud for Windows download page. Then, click the Download button to begin downloading the software. The download should start automatically.

Once you’ve finished downloading the software and running the installer, you should see iCloud appear in your Start menu on your PC. Click iCloud to launch it.

When iCloud opens, sign in to the same Apple ID account you use on your iOS device.

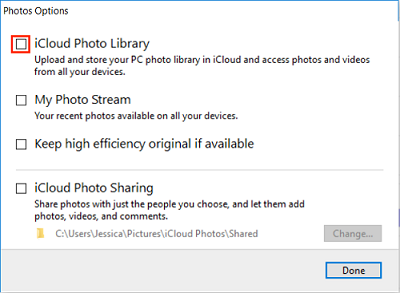
To get to your iCloud photo settings, click Options in the “Photos” section of the window.

Now, click the box beside “iCloud Photo Library” to enable the feature. This will make it so that photos from your phone that have been backed up to iCloud will be automatically downloaded to your PC.
In order to have your photos and videos from your iPhone sent to iCloud so they can be accessed on your computer, you’ll need to enable iCloud photo backup on your iOS device. To do this, open your iPhone’s settings.

Then, scroll down and select Photos.

Tap the switch beside iCloud Photo Library to have all your photos and videos automatically upload to iCloud.

After a few minutes, you should be able to access your photos on your PC. Launch iCloud Photos from your start menu to view them.

This method is great because you don’t have to worry about remembering to back up your photos to your computer. Once you enable iCloud photo library, all existing photos and videos on your device will be backed up, and any new images you capture or save in the future will be added as well. If you don’t want all your photos to be automatically transferred to your PC, and would prefer to be able to pick and choose which photos you keep on your computer, our next methods may be better for you.
Method 2: Log into iCloud.com and save photos
Our second method is similar to the first, but allows you to choose which photos you want to store on your computer, and doesn’t require installing any software. Instead of installing iCloud for Windows, you can choose to simply access your photos and videos on the iCloud website, and save whichever ones you’d like to keep on your PC.
The first step is to ensure that iCloud photo backup is enabled on your device, the same way that we showed in the first method.
Then, open your browser and go to iCloud.com.

Sign in to your Apple ID account (the same one that’s signed in on your phone.)

Click on the Photos icon to access your iCloud image library.

Look through your photo library to find any photos you’d like to save.

Click on a photo you want to save. If you’d like to save more than one, hold down the Ctrl button on your keyboard, and click on any other photos you want to select.

With the images selected, click the Download button to save the images to the downloads folder on your PC.

Repeat these steps to download any photos from your iPhone you’d like to have on your PC! If you just want to view the photos and don’t necessarily want to save them, you can use this method just for that purpose as well. Another way to transfer photos between your iOS device and PC is to use a third-party software like Dropbox.
Method 3: Use a third-party software
If you don’t have enough room in your iCloud storage space to back up your photos and videos, or for some reason you’d just rather not use Apple software and features to back up your photos from your iPhone to your PC, you may want to use another brand’s software instead. One great option you can try out is Dropbox. To start this method, open the app store on your iPhone and download the Dropbox app.

When the download is complete, tap Open to launch Dropbox.

Then, sign in to your Dropbox account (if you already have one), or sign up for a new Dropbox account to get started using the app.

Dropbox will automatically give you the option to import photos from your iPhone to Dropbox. Tap Choose Photos.

Your iPhone will ask permission to allow Dropbox to access your photos. Tap OK.

Now, select the photos you’d like to add to Dropbox. If you want to import all the photos on your iPhone, tap Select All. When you’re done, tap Next.

Next, tap Choose a Folder to decide where in Dropbox you’d like to save your photos.

Select the folder you’d like to save the photos to, or create a new one if you’d like. Once you’ve selected the folder, tap Set Location.

Finally, tap Upload to begin importing the photos you selected.

When the upload is complete, you can open Dropbox.com in your PC’s web browser, and sign in to your account.

Go to the same folder where you chose to save your photos, and you should see them appear on your PC’s screen.

That’s all it takes to get photos from your iPhone to PC using Dropbox. There are many other third-party software options you can use to get your photos from an iPhone to a PC, but Dropbox is one that we know and trust. Be careful when selecting a software to use if you’re not familiar with the company that makes or runs the software. Do your research beforehand and ensure that you’re comfortable with the software you’re downloading and using.
The last method we’re going to suggest to transfer images between iOS and Windows devices is to simply attach them to emails and send them off. This method is quite simple, and most people may already know how to do it. If you’re unfamiliar with how to add attachments to emails on iPhone, we’ll show you how to do it next.
Method 4: Send photos as email attachments
To begin, open the Photos app on your iPhone.

Then tap Select in the top-right corner.
![]()
Tap the photos and videos you want to transfer to your PC. Selected images will have a blue check mark on them. When you’re done selecting images, click the Share icon in the bottom left corner.

From the options presented on the next page, tap Mail.

Enter your own email address in both the “To” and “From” fields. In the subject line, type in whatever you’d like to label your email.

When you’re ready, tap Send to send off your email with the attached images.

To access the pictures on your PC, sign in to the email address you sent the images to from your PC’s browser. Open the email in your inbox. You should be given the option to download the attached images to your computer if you like. The steps to do this will vary slightly depending on the particular email service you use. Look for a download button and click it to download the images you sent yourself.

You can repeat this method any time you have new photos you’d like to transfer from your iPhone to your PC. Keep in mind that some email services do have limits on the size of files that can be attached to an email, so you may want to stick to only transferring a small number of files at a time (10 or less). Once you’ve confirmed that the images have been saved to your computer, you can delete them from your iPhone to free up some storage space if you like.
Now that we’ve shown you four different ways you can try out for transferring iPhone pictures to PC, we have some tips for you to keep in mind during the process that might help you out.
Tips for transferring photos from iOS to PC
1. Set up automatic iCloud backup.
Like we mentioned in the first 2 methods, it’s easy to set your iPhone settings such that your photos and videos are automatically backed up to iCloud. We’d recommend turning on the iCloud photo backup feature, so you don’t have to worry about transferring photos between your devices. This makes it easy to download your photos to your PC, and automatically keeps your photos saved outside of your iPhone in case you happen to delete one by accident.
2. Transfer photos often to save space on your device.
If you decide to use one of the last 2 methods we showed in this tutorial, and not back your photos up to iCloud automatically, we’d recommend going through the process to transfer pictures from iPhone often, so you don’t lose any photos and to allow you to free up storage space on your iOS device. Once photos have been added to your PC, you can delete them from your iPhone so they don’t take up space.
That’s everything you need to know to transfer pictures from iPhone to PC. Which of these methods sounds the best to you? If you’d like to learn about more cool things you can do with your iOS device, check out our other iPhone and iPad tutorials.