It’s common for people to want to upgrade to a new smart phone every few years. If you’re looking to get the newest iPhone to replace your current one, or have already purchased one, you might be wondering what the best way would be to go about switching to your new device without leaving all your data behind. That’s where we come in!
There are a few different ways you can transfer all your important information like calendars, contacts, pictures, messages, and apps. We’re here to tell you about the various methods and how to do them.
What this article will cover:

To begin, we’re going to explain a bit about each of the methods we’ll be showing you in this tutorial and telling you what’s so great about them. Since there are a few methods to choose from, this should help you narrow down the options to pick which one will work best for you.
Choosing the best way to transfer all data from iPhone to iPhone
A new feature Apple has introduced to make it easy for people to switch from one iPhone to another is the ability to transfer data between iOS devices during the setup process when they’re in close proximity to each other. It guides you through relocating content to your new device while you’re setting it up. To use this method, your current iPhone needs to be running iOS 11 (or newer.)
If you have a device that’s too old to run iOS 11, you can try out one of the other two methods. With Apple’s iCloud storage system that comes built-in to iOS devices, you can wirelessly transfer information and files between your devices. However, since you only get 5GB of free storage space on iCloud with your Apple ID account, you might not have enough storage on iCloud to store all the data on your device. If that’s the case for you, you can try moving your data using iTunes. This method will allow you to use iTunes on your computer as a sort of middle-man between your iPhones.
All three of these methods are fairly easy to use and completely free. All of them will allow you to transfer the most important data from your current phone to your new one, so use whichever method sounds like it will suit your needs the best.
Now that we’ve outlined and explained the three methods we’ll be showing you for how to switch iPhones, let’s get into the instructions for the first method, using Apple’s automatic setup system.
Method 1: Transfer data to new iPhone with automatic setup
1. Turn on both devices and put them near each other.
Grab both your current iPhone and your new one and turn them both on. Make sure Wi-Fi is enabled on your current device so you don’t use up your mobile data.
Then, move the devices close together. They need to be in close proximity to one another in order to use the “Quick Start” feature.

2. Select the Quick Start option on your new device.
On your new device, select the language you want to use your device in.

On your current device, the Quick Start option will appear. Tap Continue to start setting up your new device.

3. Arrange the transfer of data between the devices.
An image will appear on your new device. Pick up your current device and hold it above your new one, so that the image is centered in the view finder. Then wait for a message to finish setup on your new device.

4. Set up your security system.
Enter your current device’s passcode on your new device when the system prompts you to do so.

Then, follow the instructions on your screen to set up Touch ID (fingerprint scanning) or Face ID (facial recognition) on your new device, based on what is available for your device and your personal preferences.
5. Choose the data you would like to transfer.
You will be presented with the option to restore your data from an iCloud backup, or creating a new backup of your current device to transfer over to your new one. We’d recommend choosing the option to create a new backup so your data is as up-to-date as possible.
Once you’ve chosen a backup option, you’ll also be presented with the option to choose if you want to transfer data and settings for location services, privacy, Siri, and more.
6. Wait for the process to complete and enjoy your new phone!
Keep your two devices together until the data transfer has been fully completed. Don’t try to use either device during the process to eliminate the risk of interfering with the data transfer. Once the transfer is complete, plug your new device into a power source and make sure it’s connected to your home Wi-Fi network. That way, your music, apps, and other data can sync to your device from your iCloud account.
That’s all you need to do if you want to use the quick start method to transfer information and data to your new iPhone. Check out the next section to find out how to switch iPhones using iCloud.
Method 2: Transfer data to new iPhone with iCloud
1. Back up your current iPhone to iCloud.
In order to transfer data from your current/old phone to your new one, you’ll need to back up your data to iCloud. To do this, open your Settings.

Then, navigate to your iCloud settings by tapping your name, then iCloud, then iCloud backup.

If you haven’t enabled it yet, tap the switch at the top to enable iCloud backup. Then tap Back Up Now.

2. Start setting up your new device.
While your current device is being backed up, turn on your new device and start the setup process. This includes selecting your device’s language, country, and setting up your Wi-Fi.

3. Select Restore from iCloud Backup on the Apps and Data page.
When you get to the “Apps & Data” screen, select Restore from iCloud Backup.

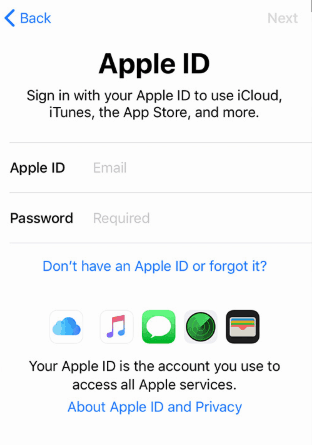
4. Sign in to your Apple ID account.
When prompted, enter the email address and password you use for your Apple ID account to access your iCloud backups.
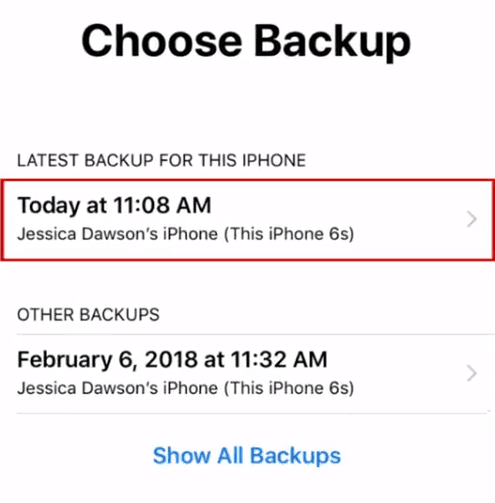
5. Choose your most recent backup to restore.
Now, select the most recent backup you just created to load that data to your new device.
6. Wait for the transfer to complete, then get started with your new device.
Leave your device alone until the data from your backup has been loaded on to your new phone. All your information, messages, photos, apps, and more.

Once the data transfer has finished, you can finish setting up your device following the instructions presented on your screen.
Those are all the steps you need to take to transfer data to your new iPhone using iCloud. If you’d like to use the iTunes method instead, follow the instructions in the next section.
Method 3: Transfer data to new iPhone with iTunes
1. Backup your current phone to iTunes on your computer.
To start, launch the iTunes software on your computer.

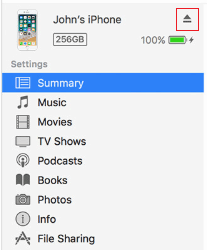
Then plug your old iPhone into your computer. You’ll see an iPhone icon appear at the top of the iTunes window. Click it to access your iPhone’s details page.
![]()
In the “Backups” section of the iTunes window, click Back Up Now.

Wait for the backup to complete, then click the Eject button next to your iPhone’s name on the left. Then you can unplug your device from your computer.
2. Plug your new iPhone into your computer.
Now, with iTunes still open, plug your new device into your computer. You’ll see the iTunes screen change to say “welcome to your new iPhone.” If this doesn’t come up right away, click on the iPhone icon at the top of your screen.

3. Select to restore data from an iTunes backup.
In order to load your data from your current iPhone to your new one, click Restore Backup.

4. Restore your new phone from the backup you just created.
Your most recent iTunes backup will be selected by default. Click Restore to begin transferring the data to your new phone.

5. If necessary, enter your Apple ID password, then wait for your data to be synced to your new device.
All that’s left to do is wait for the data transfer to complete. You may be asked to enter your Apple ID password if any of your information was encrypted. If this happens, simply enter your password to continue on with the transfer. Then, leave your device alone until the data has been moved. You may want to leave your device plugged in even after your computer indicates the process is complete, as your device will still be downloading apps and other data from the Internet, which can drain your battery.
That’s everything you need to know to move all your data and apps from one iPhone to another. No matter which method you choose to use, you’ll now have all your pictures, messages, calendars, contacts, apps, and all your other important data moved over to your new device, so you can pick up where you left off with your old one. If you’d like to learn more about the things you can do with your iOS devices, check out the iOS section of our site.