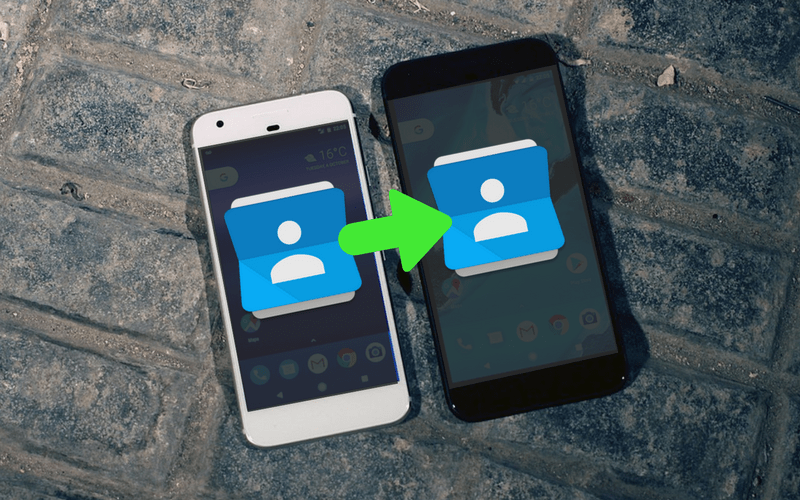
If you just got yourself a new Android smartphone, chances are, the first thing you’ll want to do (after you’ve discovered how wonderful all the new features are) is move your contacts over. You also might have lost your old Android smartphone, and need access to your information if you can’t locate the old phone. Either way, we have you covered, and can help make transferring contacts from Android to Android as easy as possible.
There are a few different ways you can sync contacts to your new Android device, and we’ll explain each one, and give you step-by-step instructions for each method. We’re going to break down each way to do this, which we’ve ranked in the order we would recommend based on how easy they are to perform, and how much time they will likely take. In this article, we’ll cover how to:
- Transfer contacts to a new Android device using Google
- Export your contacts to the SIM card on your device
- Use device-specific software (if available to you)
- Use a third-party app to transfer contacts
To kick things off, let’s go over the various ways you can transfer contacts on to your new Android mobile using Google.
Method 1: Transfer contacts to a new Android device using your Google account
For this to work, you will need to have created a Gmail account before switching to your new phone (if you no longer have it), or will need to create a Gmail account now. However, with your old Android, chances are, you already created one to use many of the features such as the Google Play store, or other Google services.
These instructions may vary slightly depending on the model you had, and the one you have now, but for the most part, they should be roughly the same. Begin by opening the Contacts app on your mobile device.

Tap the More button (three vertical dots), and then tap Settings.

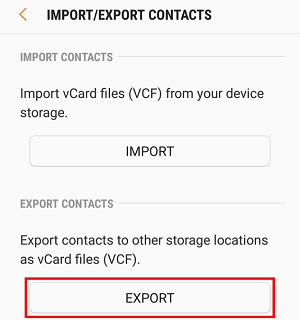
Tap Import/Export Contacts.

*HINT: If you have a newer model Android device, you may be able to skip all steps below by tapping Move Device Contacts. This will allow you to sync contacts to your Google account directly, so once you tap it, tap the name of Google account that pops up (or choose between multiple accounts if you have more than one) to backup your contacts.

If this menu option isn’t available to you, continue with the following steps. Select the Export button. This will create a VCF (vCard file) of your contacts, which can be transferred to your Google account.
From there, copy the vCard file to your PC with your preferred method; you can email it, send it over Bluetooth, or connect your smartphone to your PC with your USB charging cable. Add the file to your PC using one of these methods.
From there, head open an Internet browser and head over to google.com/contacts, and make sure you are signed in to your account. In the left-side menu, click Import Contacts.
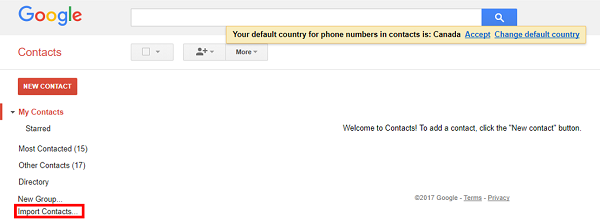
When the window opens, click Choose File. From there, browse through your PC file explorer to the location where you stored the vCard file. Double-click it to open it, and then click the blue Import button.

Then, all you need to do is wait! Google will import your contacts for you. Now, as soon as you sign into this same account on your new mobile device, your contacts will be immediately available to you, and will automatically sync as soon as you sign in! If you don’t want a Gmail account, or have issues with this for any reason, you can also choose to export the contacts to your SIM card.
Method 2: Export your contacts to the SIM card on your device
This method is similar to the method above, however, instead of exporting your contacts to another file, you simply export them to your SIM card. To do this:
Open the Contacts app from your Android home screen.
Tap the More button (three vertical dots), and then tap Settings.
Tap Import/Export Contacts.
On this menu, select Export.
Select SIM Card from the options that pop up.

Take out the SIM card, and place it in your new Android phone.
Now, your contact data will be saved on your SIM card, which you can place in your new Android device. You may be prompted by the device to determine if you want to draw contact data from a SIM card, so if this happens, select Yes.
Method 3: Use device-specific software
If neither of these methods work for you, or you don’t have a Google account or a SIM card to use, you can also use device-specific software that may come built-in to your Android device, depending on what brand of phone you have.
Some smartphones have software pre-installed to help you transfer data such as contacts to a new phone. Motorola offers Motorola Migrate, and Samsung has Samsung Smart Switch, for example. The instructions will be specific to the type of mobile you have, but in most cases, you simply download the appropriate app from the Google Play Store, open it, and then follow the prompts.

Most likely, you will need both mobile phones to be on and charged, as the app will use a USB, Bluetooth, or an NFC connection to link the two devices and transfer all of your important data.
Method 4: Use a third-party app to transfer contacts
One final option to transfer Android contacts is to use third-party software to facilitate the data transfer. One thing we’ll mention right from the start is that though most third-party services are harmless and are designed to help you, it’s possible they can do malicious things to your device such as taking and storing your personal data.
That’s why we’ve listed this method forth on our list of ways to sync contacts to a new Android device – but that doesn’t mean it can’t be useful! Essentially, these apps take out the extra work of transferring contacts by creating a vCard file, but you don’t need to go through all steps of moving through your own settings to get it.
No matter what app you download (see list below), the basic steps will be the same:
- Search for the app in the Google Play Store on your old and new Android devices.
- Select it from the results, and download and install it by tapping Install.
- Give the app permission to access your contacts.
- Follow the app-specific prompts on your phone(s) to transfer your contacts.
There are a few apps you can choose from, and you should choose the one that works best for you. Some available third-party contract backup and sync apps with 4+ star user ratings include:
- Google Contacts
- Copy My Data
- My Contacts – Phonebook Backup & Transfer
- Transfer Contacts
- Move Contacts Transfer/Backup
Now you know the best and fastest ways to transfer contacts from Android to Android. If you want to learn more about the great things you can do with your new Android device, check out our Android tips and tricks articles to make the most of your new phone! We also have a course on using the Android calling and voicemail functions.