Uploading photos to Facebook allows you to create digital photo albums that you can easily share with your family or friends. The other big bonus of uploading photos is that Facebook will save a copy of the photos on their servers, so if your computer ever breaks down and you lose the data on your own computer, you can always download them again from Facebook!
Adding Facebook Photos
You can easily share photos with friends by selecting Add Photo/Video on your Publisher, which is located on your Timeline and News Feed. A window will pop up that will allow you to go through your computer’s files to find the photo you wish to share. Navigate through this window until you find the file that you want, click to select it, and then click Open to upload it to Facebook.

Creating Albums
Not every photo is a stand-alone photo. Sometimes you have a whole bunch of photos from a particular event that should be grouped together. In these cases, you can create an album to commemorate events such as “Summer of 2011” or “Florida Fishing Trip”.
On the left hand menu of your News Feed, click your profile picture at the top to take you to your Timeline. From there, click Photos.

Now, click Create Album.

A window will pop up that will allow you to choose which photos will go in your album. To select more than one photo at a time, hold down the “Ctrl/Command” key while clicking on each photo. When you’ve selected all of the photos that you want to put in the album, click Open.
From here, you’ll be able to customize your album. The captions below corresponding to the spots we’ve numbered in the screenshot will describe some of the basic functions.

1. Album Title – Click here and type to give your album a name.
2. Description – Click here and type to add a general description for the entire album.
3. Location and Date – If all of the photos in the album were all taken in the same place or on the same day, you can apply a general location and date to all photos in the album here.
4. Added Photos – Any photos that will be uploaded to the album will appear here before you post the album. This gives you time to review, tag, or add a description to every photo before your friends can see them.
5. Tag Photos – Click this button, then click faces in the photo to tag your friends. Simply type in your friend’s name and click on their profile picture to tag them.
For more on what tagging is (with regards to Facebook), see our Facebook Tagging tutorial.
6. Photo Description – Click here and type to add a personal description for each photo.
7. Add More Photos – Hit this button to add more photos to your album. The process is the same as when you first created the album: navigate through the pop-up windows, select the file you want, and then click Open.
8. Audience Selector – Choose who gets to see this album from this menu.
9. Post Photos – When you’re finished, select this option to post the album to Facebook.
Facebook Cover Photo
A Facebook cover photo is the background to your profile page; it showcases your personality. It is publicly visible, meaning that everyone on Facebook can see it.
To change your Facebook cover photo, go to your Timeline, and then move the mouse cursor over the camera icon in the upper left corner. When the Update Cover Photo button pops up, click it.

Select to upload a photo or choose from photos you’ve already posted to Facebook.
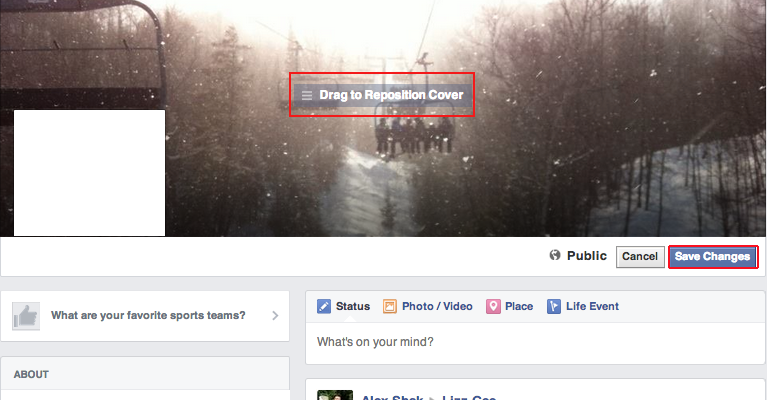
When you’ve selected a photo to use as your cover photo, you can click and drag your mouse to reposition the photo in order to change what your cover photo will display. Sometimes, this will be necessary if the photo you select is too big for the allowed dimensions for cover photos. When you’ve selected the area of the photo that you want to use as your cover photo, select Save Changes to save your cover photo.
And those are some of the different types of photos on Facebook, and how to work with them!