Making the decision to leave Facebook can be a tough one. Maybe you’re tired of being on social media, worried about your privacy, or thinking about switching to an alternative to Facebook. If you’ve chosen to deactivate your account, and then later realized you had made a mistake and wanted to get your account back, it can be confusing to figure out if and how you can reactivate Facebook. Luckily, we’re here to clear that up for you. Here’s what we’ll be covering in our tutorial:
- Can you reactivate a Facebook account?
- How to reactivate a deactivated Facebook account
- How to recover a Facebook account when you forget your password
- Tips to make it easier to get back on Facebook
Want to get started learning about Facebook account recovery? Let’s start by talking about whether or not you can reactivate a Facebook account after you’ve deleted it.
Can you reactivate a Facebook account?
Yes, you can reactivate your Facebook account if you deactivated it in the last 14 days. Your account cannot be recovered if you deactivated it more than 14 days ago, as it will have already been deleted permanently. If you’re still within the 14-day period after deactivation, it can be reactivated.

If you’ve forgotten your password and want to get back into your account, you can recover your account as long as you still have access to the email address that’s linked with the account. This holds true regardless of how old the account is, as long as you have not deleted the account.
Now that we know it’s possible to do it, we’re going to show you how to reactivate Facebook if you’ve deactivated your account in the next section.
How to reactivate a deactivated Facebook account
1. Open your favorite web browser and go to Facebook.com.
To start out, open whichever web browser you prefer to use, and enter Facebook.com in the address bar.

2. Log in to your account using the same email address and password as before you deactivated Facebook.
As you normally would, enter your email address or phone number, and your password to sign in to your account. If your account is still within the time period to be reactivated, signing in as normal will automatically reactivate your Facebook account.

3. Use your Facebook account the same way as you could before deactivation.
Now you’ll be able to use the site just as you did before you deactivated your account. Your profile, posts, photos, friends, and information will all appear the same as it did prior to deactivation. This makes it easy for you to go back to Facebook, as you don’t have to worry about setting up your profile as if it was new.

4. Make any necessary changes to your Facebook account settings.
When you deactivated your account, there may have been a reason for doing so. If you were concerned about privacy, security, or other concerns, we’d recommend changing your account settings to match up with your personal preferences.

Those four steps are all it takes to reactivate a deactivated Facebook account. If you’re looking to find old accounts, or are wondering, “how can I get my old Facebook account back?” keep on reading. We’ll be showing you how to recover a Facebook account next.
How to recover a Facebook account when you forget your password
1. Go to Facebook.com and attempt to sign in to your account.
As you normally would when you’re trying to use Facebook, open the site and enter your email address and what you think your password might be. Try this a few times and see if you’re able to get into your account. If you don’t have any luck logging in, you’ll be presented with a message about account recovery. Click Recover Your Account.

2. Click Continue to have an account recovery code sent to your email address.
On your screen now, you should see a message offering you the option to send a verification code to your email address, so you can recover your account. If you still have access to the account listed under “Send Code via Email,” click Continue to be sent a code.

If you don’t have access to that email address anymore, click No Longer Have Access to These to see what other options Facebook can offer you for methods to verify your account.

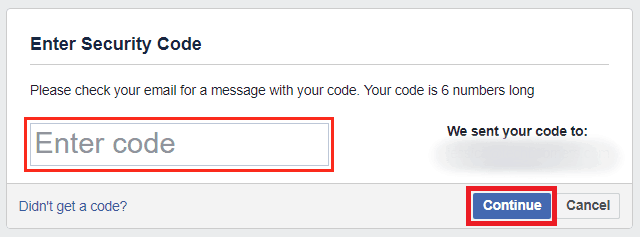
3. Check your inbox for the code, and enter it on Facebook.
After a few minutes, sign in to your email account and see if you’ve received any messages from Facebook. Be sure to check your Junk/Spam folders as well, in case the email was mistakenly filtered out of your main inbox. When you find the message in your inbox, open it and take note of the code inside. Then switch back to Facebook, click in the box labeled “Enter Code” and type the code in. Then click Continue.
4. Enter a new password for your account.
Now that you’ve verified your account recovery with the 6-digit code you were sent, you can type in whatever you’d like your new password to be.

5. Log out of other devices.
To make sure your account is secure, Facebook will give you the option to automatically have your account logged out of any other devices that may be currently signed in. This will ensure that if anyone hacked your account, they will no longer be able to use it. If you’d like to take advantage of this safety feature, select Log Out of Other Devices, then click Continue.

6. Get back to using Facebook.
Now you can get back into using your account however you normally would. Your profile, friends lists, and all your posts should still be intact. If you have any issues, get in touch with Facebook customer support.

That’s all you have to do to get back on Facebook. We hope our tutorial was useful for you! Now that we’ve helped you out, we have a few tips you might want to consider so you can help yourself out in the future. Here are some things we recommend doing to make it easier for you to get back on your account should you ever need to recover or reactivate your Facebook account again later.
Tips to make it easier to get back on Facebook
1. Keep track of your login credentials somewhere so you don’t forget them.
It’s always a good idea to come up with new, unique passwords for each account you have on every website you use to make it harder for someone to hack into your accounts. If you find it hard to remember all the passwords and codes you use for various accounts, you might want to consider using a password manager, or keeping a physical list of all the passwords you have for accounts you’ve signed up for. Check out our passwords course to learn more about creating and keeping high-security passwords.
2. Change your privacy settings instead of deactivating.
If you’re considering deactivating your account just because you’re worried about someone obtaining your personal information, we’d recommend making changes to your Facebook account settings instead of deactivating your account. Facebook gives lots of options when it comes to how much you’re okay with sharing on your profile, so you only have to share as much as you’re comfortable with.
3. On your calendar, mark the deadline for reactivating your account.
To make sure you don’t miss the deadline after which you will no longer be able to reactivate your account, make a note on your calendar or in your cell phone to remind yourself that 14 days after deactivation, your account will be permanently deleted.
4. Tell Facebook which friends you trust to help you get into your account if you get locked out.
In case your account somehow ends up being hacked, despite your efforts to keep your account secure, you can set up a feature where the friends you trust most can help you get your account back in case you ever lose access to it.
To set your trusted contacts, first go to your Facebook settings. Click the downwards arrow in the top right, then select Settings from the menu.
![]()
Then, choose Security and Login from the categories on the left side.

Under the “Setting Up Extra Security” section, you’ll see an option labelled “Choose 3 to 5 friends to contact if you get locked out.” Beside this setting, click Edit.

Now, click Choose Friends.

Type in the names of the friends you trust to help you get your account back; click on each to select them from the list of suggestions that appear. When you’re done selecting friends, click Confirm.

Now the friends you’ve selected will have the authority to help you get back into your Facebook account if and when you get locked out of your account later. This was a great security feature for Facebook to create!
That’s all you need to know about how to reactivate your Facebook account and how to recover your Facebook account. If you’d like to learn more about the site’s other features, head on over to our Facebook course. Have fun getting back on Facebook!