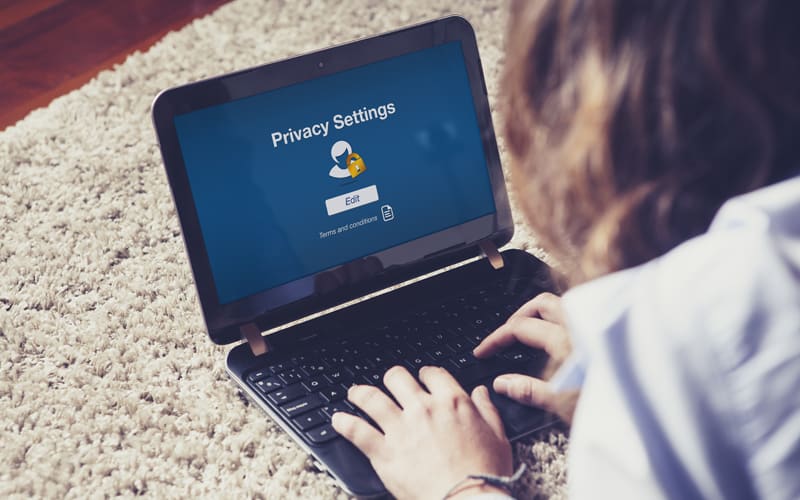
When posting on your Facebook profile, you might not always think about how many people could potentially see your posts or information. You probably trust your friends with the information you share online for the most part, however, there might be some people who you’d rather not be able to find your profile so easily. Or maybe there are some posts you’d like to share with your close friends, but not with anyone else.
Unfortunately, the reality of using social media is that sharing information online comes with risks. If your posts get into the wrong hands, it could end up costing you your job, or having someone “Facebook stalk” you in real life. If you’re looking to make your Facebook account private, we can help you do it. We’ll be covering a lot of Facebook privacy information, starting with some of the most important reasons to keep your profile private. But, if you are already convinced, jump ahead to the 7 steps to making your profile private.

If you’re looking for more general information about how to use Facebook, check out our free course here. Now, let’s jump into the good stuff! Why might you want to consider making your Facebook private?
Why should you make your Facebook private?
- Keep your personal information personal – if you don’t want people to see information about you, like where you live, where you went to school, or the company you work for, you can switch your settings to hide this information.
- Make it harder for people to find you on Facebook – you might not want just anyone to be able to find you on Facebook. Change your settings to hand-pick your Facebook friends.
- Stop people from bothering you – some people find they occasionally get messages and friend requests from total strangers. This can be avoided by changing your settings.
- Make yourself look professional – these days when applying for a job, it’s common for employers to search up their prospective employees on social media. If you change your privacy settings so less of your profile can be seen by people who aren’t friends with you, you can present yourself in a more professional way online.
- Keep your work life and personal life separate – if the wrong things end up on your Facebook profile, you could lose your job (or worse), so keeping things private can help prevent these repercussions.
Now that we’ve covered some of the reasons why we think it’s a good idea to make your account private, you’re probably still wondering, “how do I make my Facebook private?” Well, let’s move on to our guide to switching up your Facebook privacy settings and show you how to make Facebook private.
7 Steps to making your Facebook completely private
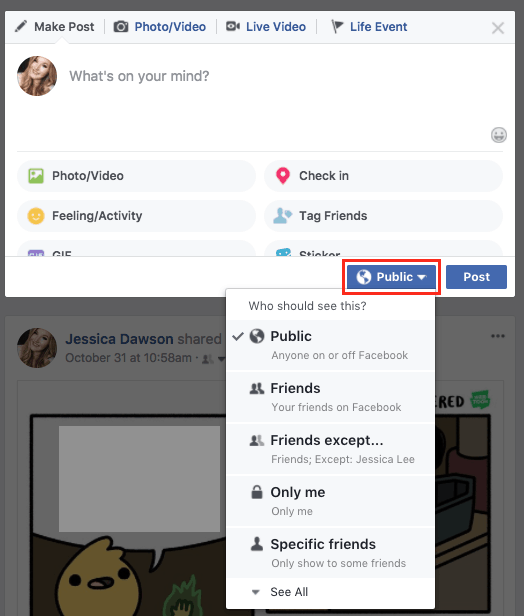
1. Change the privacy setting when you post.
When you’re posting a status update, photo, or sharing pretty much anything on your Facebook profile, you’ll be given the option to choose who will be able to see that post before you share it. You can make a post visible to Public (for anyone to see), Friends (so only people who are friends with you on Facebook can see it), Only Me (a post that is private just for yourself) or make a custom privacy setting so only certain friends can see it (like just your immediate family, for example).
To edit this setting when making a new post, click the audience selector button beside Post in the bottom right corner. This button will be labelled as whatever your current privacy setting is, so it might say “Public,” “Friends,” etc. Clicking this button will reveal a menu of options to choose from. Click on a privacy option to change to that setting.
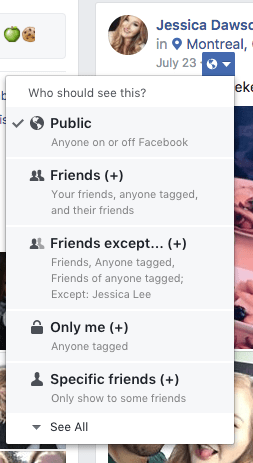
You can also change this setting after you’ve posted something on your profile. If you want to go back through your old posts and update the privacy settings, look for the privacy icon located next to the date on one of your Facebook posts.
![]()
Then, choose the privacy setting you would like to use for that post.
You can do this for each individual post on your Facebook profile. While this might seem like a tedious process, it’s a great way to pick and choose who can see specific posts on your timeline.
2. De-authorize any apps that are using your Facebook information.
Many apps make it convenient for you to log in with your Facebook credentials, like Instagram and Tinder. If you’ve used another app or website and chosen to log in with your Facebook account to save time during the sign-up process, you might decide down the line that you don’t want that app or website to have access to your information anymore. If you want to de-authorize an app you’ve logged into with Facebook, here’s how:
Step 1: Log in to your Facebook account.
In your browser, go to Facebook.com. Then, enter your email address or phone number and your password to sign in to your Facebook account.

Step 2: Access your Facebook settings.
Now you’ll need to get to your account settings. To find this page, click the downwards arrow at the top right corner of your screen. From the drop-down menu that appears below it, select Settings.
![]()
Step 3: Select Apps on the left side.
On the main settings page, click Apps from the category options listed on the left.

Step 4: Remove any apps you want to de-authorize.
Now you’ll be able to see a list of all the apps you’ve logged into using your Facebook credentials. If there are any apps you’d like to de-authorize so they can’t use your Facebook information, hover over its name, then click the X that appears to the right side.

To confirm that you want to de-authorize that app, click the Remove button.

3. Control who can post on your timeline and tag you in posts.
Another thing you might want to consider is that your Facebook friends being able to post on your timeline and tag you in posts that could show up on your own profile. This is kept separate from changing the privacy on your own posts, since you’re not the one doing the posting in this case. Luckily, you can change settings that will make it easy for you to control what shows up on your timeline.
To change these settings, select the Timeline and Tagging category from the Settings menu.

Then, review each setting in this category and change it to suit your preferences. Click Edit beside a specific setting to make changes to it.

4. Make your profile harder for people to find.
If you don’t want just anyone to be able to find and view your profile on Facebook, there are a few steps you can take to make your profile harder to find, and change what information is visible to strangers. One thing some people choose to do to make their profile trickier to locate is to replace their last name with their middle name.
To make changes to your name on Facebook, go back to Settings.

Under “General Account Settings,” you’ll see basic information like your name and email address. At the right side of the “Name” section, click Edit.

Now you can change your name on Facebook to whatever you would like to be presented on your profile. We don’t recommend using fake names, but using your middle name or part of your last name can be a good way to make it harder for people to find your profile in a search.

If you just want to make your information hidden from strangers, select the Privacy category from the left side of your settings page.

Now, make changes to your settings so they align with what you’d like to show on Facebook. Here, you can change who can see your posts and who can look you up. To make it harder for people to find your profile, focus on the “Who can look me up?” section. This affects who can find your profile in a Facebook search. Click Edit beside each setting to change it to suit your preferences.

5. Change who can send you friend requests.
On the same Privacy settings page as where you changed your settings for who can look you up on Facebook, you’ll also see a section called “Who can contact me?”. In this section, you can make changes to who is allowed to send you friend requests. You can choose to allow “Everyone” to send you requests, meaning anyone on Facebook can request to add you as a friend. Or, you can choose “Friends of Friends” so that only people who have mutual friends with you can send you friend requests.
To change this setting, click Edit on the right side.

Then, choose the setting you would like to enable – Everyone, or Friends of Friends.

6. Block or restrict anyone that bothers you.
If someone is bothering or harassing you on Facebook, you can choose to block them, so they won’t be able to contact you or see any of your posts or information. You can also choose to add them to your Restricted list. What does “Restricted” mean on Facebook? Your Restricted list is a collection of your Facebook friends who will only be able to see information and posts that you make visible to the public.
To block someone on Facebook, open their profile. Then, click the three dots at the bottom right of their cover photo. Then, select Block from the menu that pops up below.

To confirm that you’d like to block that person, click the Confirm button in the window that appears.

To add someone to your “Restricted” list on Facebook, go to your main Facebook home page.

Under the “Explore” section on the left side, select Friend Lists.

From the options that appear on your screen, select Restricted.

Now, click Add Friends to List to start adding friends.

Select the friends you want to add to your Restricted list, then click Finish to finalize your selections.

7. Check out what your profile looks like to the public.
After you’ve changed your privacy settings to the way you’d like them to be set up, we’d recommend checking out what your profile looks like to the public, or to certain friends if you’re curious what they can and cannot see. To do this, click your name at the top of your screen to get to your profile.

Then, click the three dots at the bottom of your cover photo. From the drop-down menu, click View As.

Now you’ll be able to see what your profile looks like to the public. If you want to see what it looks like to a specific friend on Facebook, click View as Specific Person.
![]()
Then, type in the name of the friend whose perspective you’d like to test out.

While you’re checking out what your profile looks like to others, make sure you’re happy with the information and posts you can and cannot see. If you happen to see information that you don’t want to be visible, go back into your privacy settings and make any necessary adjustments.
That’s all you need to do to make your Facebook account private. We hope this helps you with keeping your information and posts between you and those you care to share them with. If you’re interested in learning about Internet privacy in general, check out our courses on Internet safety, privacy, and more.