Looking for a way to record your FaceTime audio and video calls, but not sure where to start? In this article, we’ll show you how you can easily record your calls using Quicktime Player.
We’re going to start by teaching you how to record a FaceTime call made on your iPhone or iPad, but if you want to record calls on your Mac, scroll down. The easiest way to do this without hassle or video watermarks is to use QuickTime player on your computer.
QuickTime is available for both Mac and PC computers. Click to download Quicktime for Mac, or Quicktime for PC if you don’t already have it.
To record a FaceTime call on an iPhone or iPad:
1. Plug your device into your computer.
Using the charging cord that comes with your device, plug in your iPhone or iPad to a USB port on your computer.

2. Open QuickTime Player on your computer.
Go on your computer, and launch the QuickTime Player program.

3. Click File, then click New Movie Recording.
From the menu across the top of your screen, click File, then from the menu that appears below it, click New Movie Recording.

4. Select your device as the input source.
Click the Downwards Arrow button, then select your iPhone/iPad as the video input source. This will allow you to record the screen of your device through your computer. You can also select audio input source at this time.

5. Click Record.
To begin recording, click the Record button. You can wait to begin recording until your call has started, but to ensure you get all of the call recorded, we’d recommend beginning the recording beforehand.

6. Make your call on your device as you normally would.
Pick up your device (leaving it plugged in to your computer) and open the FaceTime app. Make your call as you normally would.

7. When you’re done, click Stop.
When you want to finish the recording, click the stop button.

8. Save your call recording.
To save your video, click File, then click Save.

Choose where you’d like to save your file, then click Save.

Those are all the steps to recording a call on your iPhone or iPad. You can also use QuickTime to record a FaceTime call on your Mac computer.
To record a FaceTime call on a Mac:
1. Launch the FaceTime app on your Mac.
Click the FaceTime icon to start up the app on your computer.

2. Launch QuickTime player on your Mac.
Click the QuickTime icon to open that program on your computer as well.
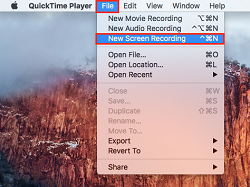
3. Click File, then click New Screen Recording.
In the menu at the top of your screen, click File. From the dropdown menu that appears below it, click New Screen Recording.
4. Click Down Arrow to choose audio input source.
Beside the record button, click the downwards arrow to reveal a dropdown menu. Click the name of your preferred audio input source. Be sure that an audio source is selected so that the audio of your call will be recorded along with the video.

5. Click the Record button.
To begin recording, click the Record button.

6. Select recording area.
Click to record your entire screen, or click and drag to select a specific area of your screen to record. Click and drag over the FaceTime window to only record that portion of your screen.

7. Begin FaceTime call as normal.
Begin your call as normal. If you’re only recording a certain part of your screen, don’t move the window to another area of your screen.

8. Click Stop button in top right to end recording.
When your call is done, click the Stop button to end the video recording.

That’s all you need to do to record a call through your Mac computer. If you don’t need to record video and only need to record an audio call, we’ll show you how to do that next!
How to record a FaceTime audio call
- Open the QuickTime player program on your computer.
- Click File, then click New Audio Recording.

- Click the Record button to begin your audio recording.

- Start your call in the same way as you normally would.

- When you’re done, click the Stop button.
That’s all you need to do to record a FaceTime audio call. Now, let’s go over a little more information about recording your video and audio calls.
4 tips for recording a FaceTime call
1. You must let the person know you want to record your call. Get their permission beforehand.
This is quite important. If you’re going to be recording a call with someone, you should let them know ahead of time and get their permission before doing so. This is especially important if you’ll be sharing/posting the recording where other people can view and listen to it. You should always get the other person’s permission before recording your call. In most places, recording someone without their knowledge and permission is illegal.
2. Set up your device and computer to begin recording ahead of time.
If you know you want to record a FaceTime call with someone, make sure you have everything set up properly in order to be able to record your call before you call them or they call you. You can plug your device into your computer and begin the audio or video recording before your call actually begins. You can always trim the beginning and end of your recording later.
3. Try to avoid anything that will cause background noise.
If you want a clear audio recording, make sure you’re in a room that’s as quiet as possible. Open windows, fans, and other things can add background noise and decrease the quality of the audio recording.
4. Find a good place to rest your device before recording.
Moving your device around or holding it in your hand can make for a shaky video and also add unpleasant background noise. If you want the best quality recording, find a good place to set your iPhone or iPad down before you begin your recording. This is especially important if you need to use or share the recording for professional reasons.
That wraps up this article on recording FaceTime video and audio calls. We hope you found it helpful! If you’d like to learn more, be sure to check out our FaceTime course.