If you’ve had enough of Evernote and are finding it too overwhelming to organize your life using its online service, you may be considering deleting your account. If you’re interested in an Evernote alternative, check out our article on the best websites and apps like Evernote. In this article, we’ll explain how to delete your Evernote account, and go into more detail (with pictures) if you need it. So, to delete your Evernote account:
- Go to www.evernote.com in your web browser.
- Sign in to your Evernote account.
- Click on your profile picture, and then click Settings from the pop-up menu.
- Scroll down to the bottom and click the blue Deactivate your Evernote Account text.
- Click the check box, and click the green Deactivate Account button.
If you need a bit more detail about how to delete your Evernote account, read our detailed list of instructions below with pictures of exactly what to do at every step!
Detailed instructions on how to delete an Evernote account
1. Go to www.evernote.com in your web browser, and sign in to your Evernote account.
Enter www.evernote.com into the address bar of your web browser of choice. Then, enter your email address and password, and sign into your Evernote account one final time.

2. Manually delete all of your notes and empty the trash can.
Delete all of your notes manually before deactivating your account. A quick way to do this is to access your Notebooks, and then delete each notebook (rather than each individual note). To do this, move your cursor over a notebook, and click the trash can icon.
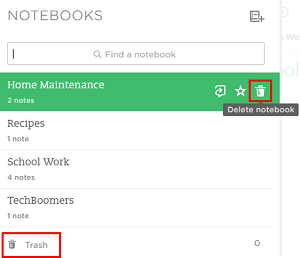
You should then click on Trash, which should be your last remaining notebook. Then click Empty Trash.

3. Access your Evernote account settings.
Click on your profile picture icon in the bottom-left corner of the screen, and then click Settings on the pop-up menu. This will take you by default to your “Account Summary.”

4. Find the button that will allow you to permanently deactivate your Evernote account.
Scroll down to the very bottom of this page, and locate the blue link titled “Deactivate Your Evernote Account.” Click on it to be taken to the page where you can permanently delete your account.

5. Confirm you want to delete your Evernote account.
On the next page, click the check box that says “Yes, I Want to Deactivate My Account”. Then, click the green button that says Deactivate Account.

Your Evernote account is now permanently deactivated! Beware, though: once you delete your Evernote account, you will not be able to log back into it. In addition, you will not be able to use the same email address to create another Evernote account in the future. Think carefully before you decide to close your Evernote account for good!