You’ve probably seen tons of cool animated GIFs on various websites and social networks like Facebook and Twitter. There are lots of animated image database sites out there, but you may still find yourself wanting to create your own custom animations. If you’re looking for ways to make GIFs yourself, look no further! Here’s what we’ll be covering in this tutorial:
- Method 1: Create an animated GIF in Photoshop
- Method 2: Use GIPHY’s free GIF maker
- Method 3: Other online GIF-makers
Method 1: Create an animated GIF in Photoshop
One of the most popular ways to create a GIF is to use Adobe Photoshop. We’ll explain how to make a GIF in Photoshop here.
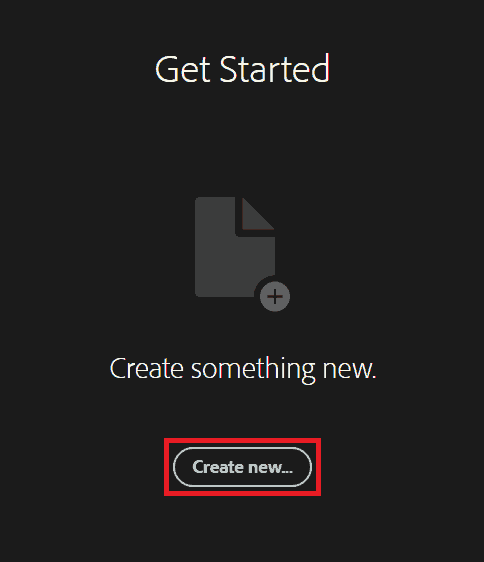
1. Launch Photoshop and begin creating a new project.
On your computer, open Adobe Photoshop to get started. If you don’t have it on your computer yet, you can download a free trial.
Download Photoshop Free Trial: PC | Mac

Then, begin creating a new project. To do this, click Create New. Then select Create on the next page.
2. Import a video from your computer to turn into a GIF.
Now, you can import a video clip from your computer to make it into an animated image. Click File in the menu bar at the top. In the drop-down menu that appears, move your mouse cursor over Import, then select Video Frames to Layers.

You can choose to import the entire video, or just part of it. If you’d like to select just a portion of it. Click and drag the trim controls to adjust what parts of the video are selected. Then click OK.

3. Preview your animation by opening the Timeline window and clicking Play at the bottom.
At the bottom of the Photoshop window, you’ll be able to see a section labelled “Timeline.” If you don’t see this section, click Window in the top menu bar and select Timeline to open it. To preview your animation, click the Play button.

4. Make any adjustments you’d like.
If you watch back the preview and you’re happy with how it looks, you can move on to the next step. However, if there are any changes you’d like to make, now is the time to do it. You can adjust the timing of each frame, remove frames to make the animation shorter, or anything else you want to change.

5. Export and save your animation to your computer as a .gif file.
Once you’re happy with how your animation looks, you can move on to exporting it to your computer’s hard drive. To do this, click File in the top menu. In the drop-down menu, move your cursor over Export, then select Save for Web (Legacy).

An export window will appear on your screen. Click Save at the bottom of the window.

Finally, choose where you’d like to save the file on your computer. Once you’ve selected the appropriate folder, click Save.

Now you can share the image on Facebook or post it to Instagram, or attach it in an email or message to one of your friends. Interested in learning about other ways to create GIFs? We’ll show you how to use GIPHY’s free, online software in the next section. This method allows users to convert a video to GIF, make a series of still images into an animated slideshow, or even convert a video from YouTube to GIF format. Want to learn how to make a GIF from a video or photos? Keep on reading!
Method 2: Use GIPHY’s Free GIF Maker
1. Open your web browser and go to GIPHY.com/create/gifmaker.
On your computer, launch whichever web browser you prefer to use. In the address bar at the top, enter GIPHY.com/create/gifmaker to access the free online software.

2. Then select which creation method to use – upload images or videos, or paste a video URL from YouTube or Vimeo.
On the main GIPHY creation screen, you’ll see that you have the option to upload images to create a GIF slideshow, import a video clip from your computer, or paste a URL from YouTube or Vimeo into the text box near the bottom. Depending on the source you’d like to use to create your animation, select the option that applies to you.

3. Follow the instructions on your screen to finish creating your GIF.
Depending on which option you’ve selected, the next steps to create your animation will vary. Follow the instructions presented on your screen to finish making your animated creation. Check out the example screens below:
Method 1: GIF slideshow from uploaded photos.

Method 2: GIF from part of uploaded video.

Method 3: GIF from video URL.

Then, you’ll be presented with some options to dress up your animation with text, stickers, and filters. When you’re happy with your creation, click Continue to Upload in the bottom right corner.

4. Download your creation and save it to your computer.
The next step is to upload your animation to GIPHY.com. To do this, click Upload to GIPHY.

Once the upload is complete, you’ll be taken to the page for that image. To save it to your computer, click Download on the right.

Then, next to “Social,” click the blue Download button.

That’s all it takes to use GIPHY’s GIF maker online for free. In the next section, we’ll tell you about some other popular online options to create an animated image.
Method 3: Other online GIF-makers
1. IMGflip.com
![]()
IMGflip.com is both a fun online image database and a convenient, free GIF and meme maker. When you create an animation with IMGflip, you can choose to download it and keep it for yourself, or share it to their database for other people to enjoy as well. If you share them to the IMGflip database, you can even submit your animations to be featured on the site, and track their popularity among other users.

2. GIFMaker.me
![]()
Another great option is GIFMaker.me. This website is simplistic and easy to use, but also offers lots of additional features that some other GIF creators don’t offer, like resizing the canvas, controlling the speed and number of times the animation repeats, and adding music.

3. EZgif.com
![]()
EZgif.com is also quite easy to use and allows for users to create GIFs from uploaded photos or videos, or source them from URLs of videos already posted online. You can also use their effects options to add a filter, adjust the animation speed, crop the image, add text, and more.

4. Flixel Cinemagraph Pro

The last software we want to tell you about is a bit different than the others we’ve mentioned. The software is called Cinemagraph Pro and it’s made by Flixel. You can use Cinemagraph Pro to create high-quality animated images called cinemagraphs. It’s a little more advanced than the other options listed, and is exclusive to Apple devices, but it gives you more creative freedom and allows for a much higher quality result. You can download Cinemagraph Pro for your Mac computer, or download the app for your iOS device.
Download Cinemagraph Pro: Mac | iOS

That covers everything you need to know about how to make a GIF yourself to enjoy your own custom animations. If you’d like to find out more about other ways you can create and share images and videos online, check out the rest of our video and image sharing page. Or, find out about other fun entertaining sites and apps in our fun and games section.